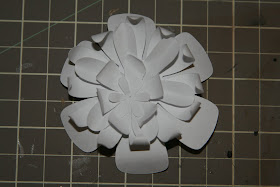
When I am playing around with my Cricut and trying different ideas, I learned the hard way to cut everything out on plain printer paper first to make sure that I like it before cutting up my expensive scrap paper!

Once I find the sizes and shapes I like, I cut them out with the good paper. I used flowers from the Graphically Speaking cartridge and Plantin Schoolbook Cartridge. If you don't have a Cricut, you can still do this. You can use punches or print flower patterns from the internet to cut and trace onto scrap paper. In the future I am even going to try to draw some flowers free hand. I think that would be a pretty unique look!

Next I take each piece and distress them. I used Tim Holtz distress ink in Vintage Photo, and a Making Memories tool to rough up the edges a little.

Then I used an old embossing tool to curl the petals. You could use a toothpick or anything else handy.

For one of the flowers, I folded the petals in half length wise for some variety.

Voila!

Here's a sneak peak at my unfinished cover:


Beautiful! Thanks so much for sharing how you made these. Have you sent this project to the Graphic 45 blog for their gallery? If not, you should!
ReplyDeleteBonnie
This is gorgeous!
ReplyDeleteVery gorgeous, Tanya! Thanks for blog hopping!! Barb
ReplyDeleteI'm in awe of those who can make their own flowers. They're absolutely beautiful - and I'm afraid to say I just don't have the patience for it.
ReplyDeleteTanya this is just beautiful. awesome job!!!!
ReplyDeleteI love that flower. I just bought some Graphic 45 paper and want to try that out for my album. Thank you so much for sharing!
ReplyDeleteI have cut up tons of pretty paper, only to realize I did not like the way that it finished up and such....good tip on using the plain white paper first.
ReplyDeleteYour flower is beautiful Tanya. Thanks for sharing.
~Tonya
Beautiful flowers! Thanks for sharing your tips.
ReplyDeletethe cuts, the papers and the inking, excellent! beautiful! i sometimes use the back of my ugly papers to do trial cuts. tfs!
ReplyDeleteI have a cricut but haven't used it to its full potental.
ReplyDeleteI love to make my own embellishments as well. I don't even know why I buy them anymore. LOL.
Beautiful flower.
wonderful flower
ReplyDeleteI LOVE Graphic 45! Awesome job and great blog!!!
ReplyDeleteLove the vintage look, I have got to try that thanks so much for sharing. Great blog, sure like that background.
ReplyDeleteThis is really cute, I love the distressed look you added!
ReplyDeleteI love your flower Tanya! And your blog background doesn't look halloweeny at all...I think it looks great and you could use it all year long!
ReplyDeletewow this is a great flower , love it
ReplyDeleteWow -this flower is fantastic! Very inspiring, thanks for Sharing. :)
ReplyDeleteLook at you go.Love the heritage and sentimental feel to all your projects. They are so lovely
ReplyDeleteDo visit my blog to pick up your award sweetie
Thanks for showing us how to do these beautiful flowers.
ReplyDelete