I will take you through the steps I took to create my button. Let me know if you have any questions!
1. Design your button. You need to have some kind of image editing software. I used Photoshop Elements to create mine. I opened a new canvas and sized it to 150x150 pixels. You could also do 125x125 pixels. You just want to size it to fit the average sidebar. I chose a resolution of 300, but a lot of folks use 72. I wanted mine to look like my blog, so I used a section of my header as my picture. (Since I didn't create my header myself, I emailed Karen over at thegraphicsfairy.com to get her permission to create a button out of her work.) You could also design a button using free clip art you can find on the internet, or you could even design something out of your scrapbooking papers and supplies and just take a picture of it. Then I chose a font and typed my blog name onto my image, put a black border around it, and I was done. Make sure you save your work as a jpeg.
2. Upload your button to an image hosting site. I used Photobucket.com, which is free.
3. Open your blog to where you add page elements. Click on "Add a Gadget" and select HTML/JavaScript.
4. Copy this code into the text area:
<img src="http://YOURBUTTONLOCATION.jpg" /> <br /> <textarea style="text-align:center" rows="4" cols="22"><a border="0" href="http://YOURBLOGADDRESS.com" target="_blank"><img src=http://YOURBUTTONLOCATION.jpg></a></textarea>
Replace YOURBUTTONLOCATION with the location of your image. If you used Photobucket, they provide you with a direct link to your photo's location. Replace YOURBLOGADDRESS with your blog address:)
Let me know if you have any trouble, I will help any way I can.

Sunday, March 21, 2010
Saturday, March 20, 2010
I created a blog button
I am not tech savy AT ALL, but I think I managed to create a button for my blog. It looks right, but I have no idea if it will actually work or not. Something has to go wrong...it won't link or something... So if any one has any interest, try it out. Then, if it does actually work, and anyone wants to know how I did it so you can get your own, let me know and I will walk (stumble) you through it.
Friday, March 19, 2010
New Blog Look
I found this blog background and header on www.backgroundfairy.com It was under the Halloween category, but I really love it! I think it can be used as an every day background. Let me know if I'm wrong :)
Marla's a winner!
Marla over at www.lakeavenuedesigns.blogspot.com has won my Target finds giveaway. Congratulations, Marla! I became a follower of your blog, you do awesome work!
Thursday, March 18, 2010
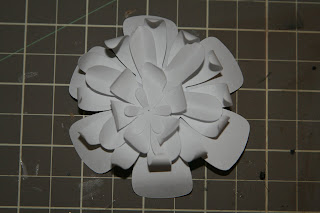
Graphic45 Flower
I am working on a new mini using the Graphic45 Le' Romantique line of papers. I wanted to show you how I designed one of the flowers that I am going to put on the cover. The cover is about half way completed.
When I am playing around with my Cricut and trying different ideas, I learned the hard way to cut everything out on plain printer paper first to make sure that I like it before cutting up my expensive scrap paper!
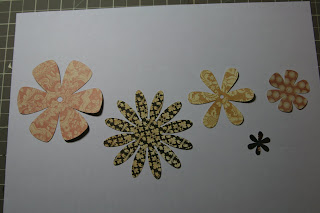
Once I find the sizes and shapes I like, I cut them out with the good paper. I used flowers from the Graphically Speaking cartridge and Plantin Schoolbook Cartridge. If you don't have a Cricut, you can still do this. You can use punches or print flower patterns from the internet to cut and trace onto scrap paper. In the future I am even going to try to draw some flowers free hand. I think that would be a pretty unique look!
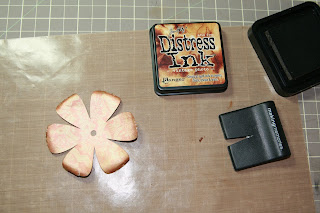
Next I take each piece and distress them. I used Tim Holtz distress ink in Vintage Photo, and a Making Memories tool to rough up the edges a little.
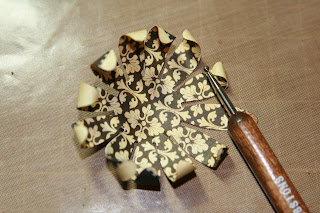
Then I used an old embossing tool to curl the petals. You could use a toothpick or anything else handy.
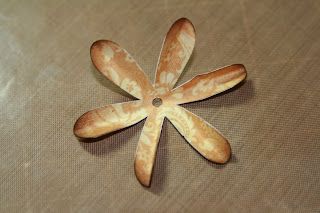
For one of the flowers, I folded the petals in half length wise for some variety.
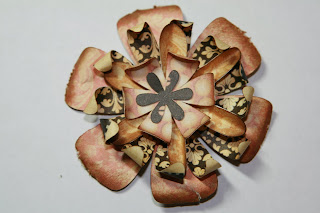
Voila!
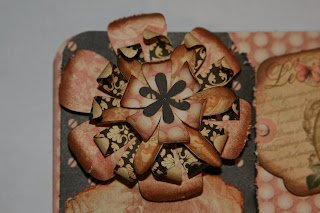
Here's a sneak peak at my unfinished cover:

Tuesday, March 16, 2010
HUGE Target Sale!


Look what I found at my local Target today. Inkadinkado stamps for $2.24 a piece. Paper Shaper punches for $1.74 and $2.24. Tons of K&Company embelishments for less than a dollar or just over a dollar. A Fiskars border punch for $3.24! I want to share my find. I am going to draw a winner from my followers on Friday. They will win the items in the first picture, which is 4 Inkadinkado stamps, a Fiskars boarder punch, and two Paper Shapers punches. If you are already a follower, you don't have to do anything to enter, isn't that nice for a change?
Monday, March 15, 2010
I got an award!

I just received a Creative Hands award from Pam over at www.thebugbytes.com
Thanks so much, Pam! If any of you have a Cricut and use a Gypsy, you have to visit her site. She has all kinds of downloadable files for the Gypsy and DS on there. She also has video tutorials. One of my favorite projects from her blog is here: http://www.thebugbytes.com/2010/03/walking-barefoot.html . She made some absolutely beautiful purses using the Tags, Bags, Boxes & More cartridge. My favorite one is made out of a brown paper bag that she altered to look like real leather. I really want to try that one. Check it out!
Tuesday, March 9, 2010
Subscribe to:
Posts (Atom)